Showing posts with label Nibbles. Show all posts

Wednesday, June 27, 2012

Host Your Own Cheese Night


The Night of Cheese wrap-up is complete! In case you missed a course, here is the rundown:


Maybe you are completely tired of cheese at this point (shame on you!), or maybe this series has inspired you to throw your own cheese tasting. If you are looking for any easy place to start, you can refer to the ideas and tips in the posts above, or you can check out this post I wrote for From Scratch Club about De-Mystifying the Cheese Plate. Learn about how many cheeses you should put on a cheese plate (three or five), what type of milk to choose, mixing textures, appropriate serving sizes, how to arrange the plate, adding accouterments, and much more! If you have any more questions about cheese (how to use it, how to buy it, what to do with it), email me or leave me a comment!

Wednesday, August 17, 2011

Peach Fruit Leather


Peach Week goes nostalgic today, with a take on old-school Fruit Roll-Ups. In efforts to "adultify" this a bit, let's call it Fruit Leather, instead. Most recipes you find will tell you that fruit leather requires a dehydrator, but I'm going to debunk that myth. You can most definitely make fruit leather in your standard old oven. Any fruit can be used to make fruit leather, but "firmer" fruits (like apples and pears) might require a bit of water to "loosen" the puree up.


********************

Peach Fruit Leather
Makes Eight Large Strips

4 cups peaches (skinned, pitted and diced)
1/3 cup sugar
1 teaspoon ground cinnamon
1/2 teaspoon ground ginger
1/2 teaspoon ground cloves

1. In a blender, puree all ingredients together until smooth (if the puree is a bit thick, add some water to thin it out).

2. Line a jelly roll pan with waxed paper or a Silpat and spray with nonstick cooking spray. Preheat oven to 175 degree Fahernheit (if it doesn't go that low, heat to the lowest setting).

3. Spread the puree onto the prepared pan and spread out into a thin layer. Bake in the oven for 6-8 hours (or longer if necessary - a humid day might cause this to take longer). The fruit leather is "done" when it easily pulls off of the waxed paper or Silpat and stays together (with the pliability of actual leather).

4. Fruit leather can be wrapped in waxed paper and stored in the refrigerator for up to two months. This makes a great treat for lunches (especially with Back-to-School coming up!) and doesn't have any of the nasty chemicals or preservatives of conventional Fruit Roll-Ups. Enjoy!

Monday, June 27, 2011

Strawberry-Basil Popsicles

The strawberry marathon continues! This time around it is Strawberry-Basil Popsicles, a super-easy treat that is just perfect for the heat and humidity coming our way in the Northeast.


Growing up, I spent a lot of time at my Aunt Laura's house. Her kids were about my age (my cousin Logan is just a month older than me), and since my aunt worked as a secretary for the school, she had summer's off. My first introduction to homemade popsicles came from those summers, when Aunt Laura would take Kool-Aid or whatever other fruity drink was around and pour it into an ice cube tray. She would place plastic wrap over the top, then stick toothpicks into each cube segment and freeze the whole thing to make little mini popsicles. The weight of the popsicle was often too much for a flimsy little toothpick, but it was no matter to us, we were happy to have a chilly treat for those hazy Upstate New York summers. Making these popsicles reminded me of Aunt Laura and, like any good food should, evoked memories of other times.


********************
Strawberry-Basil Popsicles
Makes 6-8

1/3 cup sugar
1/3 cup water
10-12 basil leaves, roughly chopped or torn
4 cups strawberries

1. Combine the sugar, water, and basil in a small saucepan. Cook over medium-high heat until sugar dissolves and mixture begins to boil.

2. Remove sugar mixture from heat and allow to cool. Be sure to muddle the basil leaves with a wooden spoon to release oils. This is essentially a basil simple syrup recipe. Use more or less basil to taste. Remove basil leaves after about 10 minutes.

3. In a blender, puree strawberries. Add basil simple syrup and blend again. For a smoother consistency, strain mixture through a fine sieve to remove seeds. Pour mixture into popsicle mold or into biodegradable disposable cups. Place popsicle stick or spoon into the center of each popsicle and freeze for three hours or overnight.

4. To unmold popsicles, simply run the mold or cups under hot water for a few seconds. Best enjoyed barefoot and/or in a hammock.

PS - In case you couldn't tell, this recipe is baby-approved.

Monday, June 20, 2011

Strawberry Salad

Salad greens from my mother's garden; berries picked by me

Two words indicative of summer are strawberry and salad. Put them together, and experience a flavor profile that is reminiscent of running barefoot through sprinklers, making s'mores, getting sun freckles on one's shoulders, and backyard camping in rickety tents. This Strawberry Salad is a quick, easy meal that can be whipped up for a tasty lunch or healthy dinner. Enjoy!

********************

Strawberry Salad with Candied Walnuts
Serves Two

5 cups (for me, about 4 big handfuls) salad greens, washed and dried
1/2 cup red onion, sliced
1/3 cup feta cheese, crumbled*
1/2 cup sliced strawberries
1/2 cup walnuts, shelled and halved
1 egg white
1 tablespoon sugar
1 teaspoon cinnamon
1/2 teaspoon cloves
1/2 teaspoon paprika
1 1/2 tablespoons extra virgin olive oil
1 tablespoon balsamic vinegar
Salt and pepper, to taste

1. Preheat the oven broiler (or set oven to 500 degrees Fahrenheit). Combine egg white, sugar, cinnamon, cloves and paprika. Add nuts and mix with fork. Place nuts on a foil-lined cookie sheet and bake for 10 minutes or until golden.

2. Meanwhile, combine the salad greens, red onion, cheese and strawberries. Once walnuts are done, sprinkle on top of salad. Drizzle with balsamic vinegar and olive oil. Season as desired with salt and pepper.  Serve immediately.

*Bleu cheese would also be delicious!

Monday, February 7, 2011

Turkey Burgers and Oven Fries

What better way to celebrate the potato than with fries! While I could definitely just eat fries alone, I thought a spin on the classic combination of "burgers and fries" would be more apropos (bonus - did you know potatoes are naturally fat free? AWESOME!).


********************

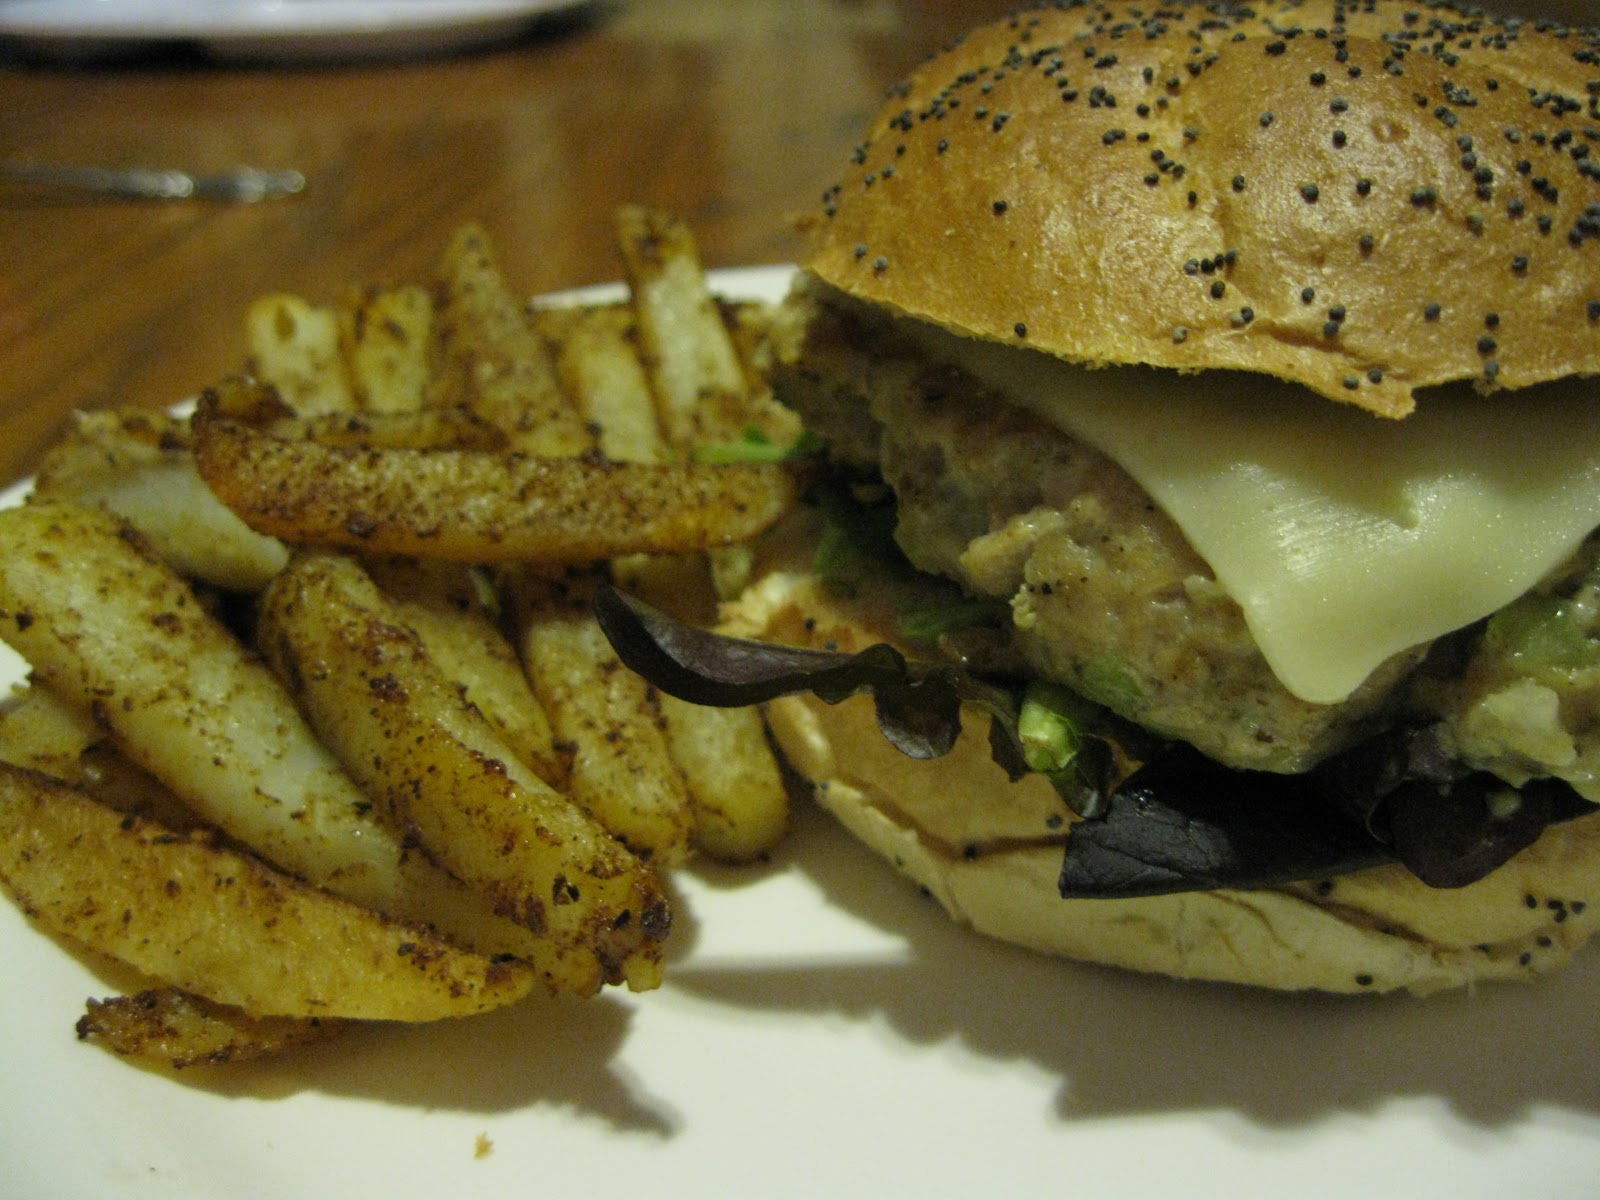
Turkey Burgers with Honey Mustard Dressing
Makes 4 burgers

2 tablespoons olive oil
1 1/2 pounds ground turkey
1 egg, beaten
2 cloves garlic, minced
1 medium stalk celery, minced
1/2 apple, peeled and diced small
2 shallots, minced
1 teaspoon dried parsley flakes OR 1 tablespoon fresh parsley, chopped
1/2 teaspoon salt (or to taste)
1/2 teaspoon pepper (or to taste)
1/4 teaspoon Bell's Seasoning
1/2 cup mayonnaise
1/4 cup Dijon mustard
1/4 cup honey
4 poppy seed kaiser rolls (or bread of choice)
2 cups spring mix or other baby lettuce
4 slices American cheese

1. Heat a large skillet over medium-high heat. Add olive oil.

2. In a large bowl, mix together turkey, egg, garlic, celery, apple, shallot, salt, pepper, parsley and Bell's Seasoning. Mix until all ingredients are incorporated. The turkey mixture will be very wet. Form into four patties and place in skillet.

3. Cook burgers for 4-5 minutes. Turn, and cook for an additional 4 minutes.

4. In the meantime, split and lightly toast kaiser rolls. In a medium bowl, whisk together mayonnaise, mustard and honey.

5. Spread 2 tablespoons of honey mustard dressing on one half of toasted kaiser roll. Layer spring mix on bottom half of kaiser roll, top with one turkey burger patty, American cheese (if desired) and top half of kaiser roll.* Enjoy!

*On second tasting, I substituted honey mustard dressing with Silly Goose Farm ginger-peach chutney (available for purchase soon!) and the American cheese for bleu cheese - it was equally delicious!

********************

Oven Fries with Spicy Ketchup
Serves 4*

4 large potatoes, peeled**
2 tablespoons olive oil
3 cloves garlic, minced
2 tablespoons coarse salt
1 tablespoon cracked pepper
2 teaspoons paprika
1/2 teaspoon allspice
1 cup ketchup
1 teaspoon cumin
1 teaspoon chili powder

1. Heat oven to 450 degrees Fahrenheit. Line a baking sheet with aluminium foil.

2. Cut potatoes into "sticks" as uniformly as possible. Place in a large pot and with enough cold water to just cover. Boil over high heat until potatoes are just pierced with a folk.

3. Remove potatoes from boiling water and place on baking sheet. Coat with olive oil. Top with garlic, salt, pepper, paprika and allspice. Toss to coat.

4. Bake potatoes on top shelf in the oven for 10 minutes. Turn and bake for another 10 minutes (or until desired "browning" is reached).

5. In the meantime, combine ketchup, cumin and chili powder in a small bowl. Mix to combine.

6. Serve oven fries with spicy ketchup. Enjoy!

*This recipe can easily be increased or decreased.

**I used Red Chieftain potatoes from this year's crop, but the potato gold standard (Yukon Gold, that is) is a wise choice.

Saturday, June 12, 2010

Pecan Shortbread


Earlier in the week, Dave's colleague, Dr. MacDonald, came over to the farm to start in on a new work project. I always feel terrible if I don't have some sort of little treat to offer our guests (even though I know most of them could care less), so I decided to try whipping up a batch of shortbread.

Dave is, without doubt, a shortbread junkie. Especially when we went to Scotland, he was pretty psyched for all the shortbread we were offered. So I knew Dave would at least be happy. But to be honest, I had never made shortbread before, and because it requires such few ingredients, there was little room for error. I was worried everything that went into making this little morsels had to be top-notch, or else they just wouldn't taste right.

Well, I didn't have the highest quality ingredients, but I had pretty decent ingredients, and I think this shortbread turned out great. It went quick, at least! The key is making sure the butter stays really cold, just like when you make pie crust, biscuits, or any other pastry. I used the shortbread recipe from Better Homes and Gardens New Cookbook: Celebrating the Promise.

*******************************************
Shortbread
Makes 16 wedges*

1 1/4 cups all-purpose flour
3 tablespoons granulated sugar
1/2 cup butter

1. Preheat oven to 325 degrees Fahrenheit. Combine flour and sugar. Using a pastry blender**, cut in butter until mixture resembles fine crumbs and starts to cling. Knead until smooth and form into a ball***.

2. To make wedges, on an ungreased cookie sheet, pat dough into an 8-inch circle. Make a scalloped edge. Cut circle into 16 wedges. Leave wedges in a circle. Bake for 25 to 30 minutes or until bottom starts to brown and center is set. Recut circle into wedges while warm. Cool on cookie sheet for 5 minutes. Cool on a wire rack.****

*I cut mine into 8 wedges, just because 16 seemed a little skimpy.
** Don't worry about fancy tools like a pastry blender. They have useful applications, but for recipes like this, just cut the COLD butter into cubes and use your fingers. It allows you to really feel the dough and judge its texture.
***I found the dough to be a little dry, so I added 1 tablespoon of cold water. It made a perfect dough.
****I had some finely chopped pecans on hand, so I threw in about 1/4 cup of those pecans in. It was a really nice touch. I also decided that these shortbreads needed some chocolate, so I melted 6 ounces of semi-sweet chocolate, 1 tablespoon of butter, and about 1/4 cup of whole milk (though you could use cream) over a double boiler. I just drizzled this "ganache" over the shortbreads after they were cooled and then sprinkled some more pecans on top, because I like it when food looks like it tastes, know what I mean? I kept them on a cookie sheet and put them in the freezer for about 15 minutes to make sure the ganache hardened properly.
******************************************

These pictures definitely aren't the best, sorry!

That's it! It was really easy, and I think my first attempt at shortbread was a decent one. Dave and Dr. MacDonald were very productive at their "dining room table" meeting. I'd like to think it was because of the brain fuel I provided them via these cookies, but in reality, it was just because they are both young, brilliant and motivated. Ah, well.