I met Lauren from Craft My Life Away at the From Scratch Club food swaps. As a first-time swapper, I was eager to get to know Lauren... especially since she brought these insane salted caramel bars that were a hot-ticket item at the swap. Seriously, they were soooo good.
Anyway.
Lauren is a pretty nifty lady, as she is a excellent baker/confection maker and crafter. Since each year I try to send my friends and loved ones a little treat for the holidays, I thought I'd ask Lauren to share her Salted Caramel recipe with me (us) - they'd be perfect to send in the post! So, Lauren, have at it. School us in all things caramel!

Showing posts with label DIY. Show all posts
Showing posts with label DIY. Show all posts
Thursday, December 13, 2012
Tuesday, October 30, 2012
Homemade Halloween Goodies
First off, I'm hoping anyone affected by Hurricane Sandy is doing well. Best wishes for a safe and speedy recovery.
If you are like me, you probably waited until the last minute to get your Halloween goodies together. Fear not - there is still time to make some treats from scratch!


If you are like me, you probably waited until the last minute to get your Halloween goodies together. Fear not - there is still time to make some treats from scratch!


If you don't have the time to make your own, I'm going to let you in on a new favorite secret of mine: G.H. Cretors popcorn! This stuff is bonkers good, and the best part is that it's Gluten-Free, GMO-Free, Kosher, and made with all-natural ingredients.
The Chicago Mix is definitely my favorite - it's a mix of cheese and caramel corn. I love the Caramel Nut Crunch, too.
Get a sample pack and try them all out! So good. You can buy on the site, on Amazon or use the store locator for more information. This would be an awesome holiday present (hint hint). Keep tabs on G.H. Cretors on Facebook.
Good luck prepping for Halloween! Are you handing out candy or going the extra mile to make something special? How many trick-or-treaters do you get? (We get two.)
Friday, August 31, 2012
How To Sterilize Jars

An essential part of home preservation and canning is being sure to sterilize canning jars. You never know what kind of germies might be in there that could make your carefully-crafted pickles, jams, or preserves turn into mold-ridden stomachaches (or worse!) waiting to happen. Sterilizing is the process of killing harmful bacteria that can accumulate in jars and on lids. This happens by heating jars/lids to a minimum of 175 degrees Fahrenheit for at least 15 minutes. Sterilizing gives you a "blank slate" for your canning creations and eliminates most bacterial risks for contamination.
Some sources say that if you are pressure-canning an item or processing in a hot water-bath canner for more than 15 minutes, there is no need to sterilize jars; however, I feel very strongly that you should sterilize anyway. It only takes a few minutes and gives you hot jars needed for many hot-packed canning recipes (ie - recipes that require hot liquid/preserves be poured into hot jars to prevent jar breakage).
There are a couple methods to sterilizing your jars. My preferred method is in the oven, just because I feel it's less messy (and safer/less likely to burn my arms and hands) than other methods.
How to Sterilize Jars in the Oven
Place clean jars and lids in a baking dish or carefully on a baking tray (I use an old enamelwear roasting pan because I can slide it in and out of the oven easily without worrying about the jars falling out. I place the lids in the upside-down lid of the roaster). Put them in a 200 degree Fahrenheit oven for 15 minutes. If you aren't quite ready to fill your jars, turn the oven down to "warm" or to it's lowest setting and let jars/lids sit until you are ready. Not only does this sterilize your jars, but it softens the rubber on canning lids to create a better seal when processing jars. The oven method eliminates having to pull jars full of boiling water out of the hot water-bath canner and allows for many jars to be sterilized at once.
How to Sterilize Jars in Hot Water
Place clean jars in a canning rack, then add about 1-inch to 2-inches of hot water to each jar (this keeps jars from floating once they hit the water). Carefully lower canning rack into the canner filled with enough boiling water to cover jars by at least one inch. Boil jars for 15 minutes. Remove jars/rack from canner and dump hot water back into canner from jars. Place jars upside-down on a fresh towel to drain out remaining water.
In the meantime, put lids in a small pot and cover with water (overlapping is fine, but don't stack them right on top of each other). Boil for 5 minutes. Remove lids with a lid lifter.
How to Sterilize Jars in the Dishwasher
If your jars haven't been recently washed, place jars and lids in the dishwasher and clean according to your dishwasher's instructions. Remove hot jars/lids from dishwasher and use immediately.
If your jars and lids are clean, sterilize them using an Express Glass or Sanitize setting on your dishwasher (no soap necessary). Remove hot jars/lids from dishwasher and use immediately.
Wednesday, August 22, 2012
Help Me Pick Paint Colors!
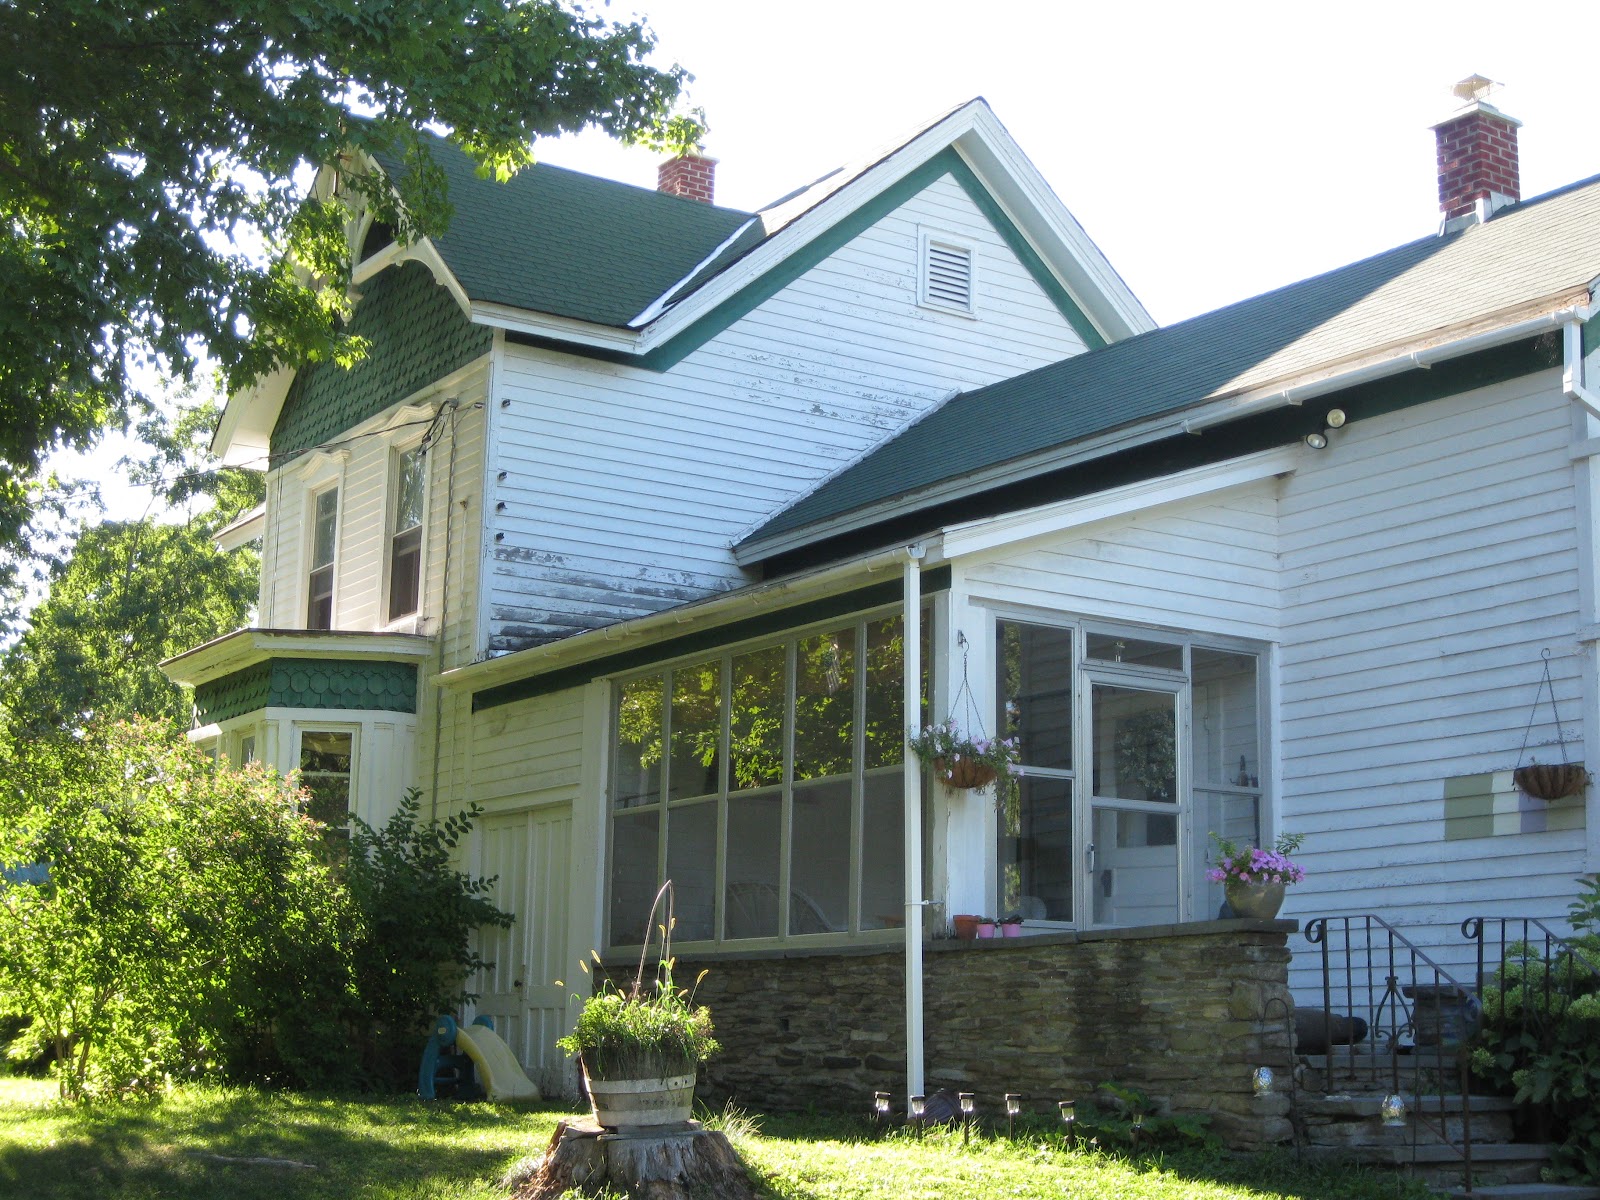
I've been planning on painting the farmhouse for a while now. When we first bought the house, the paint was in good shape, I just wasn't crazy about the colors (the green felt dated and the white-on-white main field and trim caused a lot of the Victorian detail to get lost). Now, the paint is really chipping off and the house looks a little, well, dumpy. The last time the house was painted was probably 20 years ago, so I'm hoping that with good preparation and quality paint, this paint job will last another 20.


The roof is dark green, which kind of limits the colors we can use on the house. But that's okay, since I really wanted to include some green on the house, anyway. I've tested a bunch of colors on the house and I think I've finally narrow the choices down... but I need help! Here are the three color schemes I've decided on - would you be so kind as to help me choose one? Thanks!
So, here's how the palettes work: The upper left color is the main color on the house. The upper right color is the primary trim color (mostly on the window trims and shakes in the gables). The bottom left color is the secondary trim color, going on window details and other architectural trim. The bottom right color is the accent for the Victorian arches in the gables, the doors, window boxes, and some detail around the bay window. (Heads up: The colors read a bit darker on the screen than in real life).
Option One:


Whaddya think? The colors definitely read differently here than on the house, but I think you'll get the gist. As excited as I am to paint the house, I'm not looking forward to the grunt work. Thanks for your help with the colors, and if you have other ideas, please share!
Here, you can see some of the details on the house... I'm also working on new landscaping, so stay tuned!


The front of the house... I'm hoping to put a front porch on the house in the next few years.
The roof is dark green, which kind of limits the colors we can use on the house. But that's okay, since I really wanted to include some green on the house, anyway. I've tested a bunch of colors on the house and I think I've finally narrow the choices down... but I need help! Here are the three color schemes I've decided on - would you be so kind as to help me choose one? Thanks!
So, here's how the palettes work: The upper left color is the main color on the house. The upper right color is the primary trim color (mostly on the window trims and shakes in the gables). The bottom left color is the secondary trim color, going on window details and other architectural trim. The bottom right color is the accent for the Victorian arches in the gables, the doors, window boxes, and some detail around the bay window. (Heads up: The colors read a bit darker on the screen than in real life).
Option One:

Option Two:

Option Three:

Whaddya think? The colors definitely read differently here than on the house, but I think you'll get the gist. As excited as I am to paint the house, I'm not looking forward to the grunt work. Thanks for your help with the colors, and if you have other ideas, please share!
Wednesday, August 17, 2011
Peach Fruit Leather

Peach Week goes nostalgic today, with a take on old-school Fruit Roll-Ups. In efforts to "adultify" this a bit, let's call it Fruit Leather, instead. Most recipes you find will tell you that fruit leather requires a dehydrator, but I'm going to debunk that myth. You can most definitely make fruit leather in your standard old oven. Any fruit can be used to make fruit leather, but "firmer" fruits (like apples and pears) might require a bit of water to "loosen" the puree up.

********************
Peach Fruit Leather
Makes Eight Large Strips
4 cups peaches (skinned, pitted and diced)
1/3 cup sugar
1 teaspoon ground cinnamon
1/2 teaspoon ground ginger
1/2 teaspoon ground cloves
1. In a blender, puree all ingredients together until smooth (if the puree is a bit thick, add some water to thin it out).
2. Line a jelly roll pan with waxed paper or a Silpat and spray with nonstick cooking spray. Preheat oven to 175 degree Fahernheit (if it doesn't go that low, heat to the lowest setting).
3. Spread the puree onto the prepared pan and spread out into a thin layer. Bake in the oven for 6-8 hours (or longer if necessary - a humid day might cause this to take longer). The fruit leather is "done" when it easily pulls off of the waxed paper or Silpat and stays together (with the pliability of actual leather).
4. Fruit leather can be wrapped in waxed paper and stored in the refrigerator for up to two months. This makes a great treat for lunches (especially with Back-to-School coming up!) and doesn't have any of the nasty chemicals or preservatives of conventional Fruit Roll-Ups. Enjoy!
Saturday, July 23, 2011
Herbal Digestif

I made this herbal digestif for the food swap I recently attended. This is a simple recipe with spectacular results - perfect to keep on hand for last minute host gifts and to offer guests at impromptu drop-ins. Herbal digestifs are great aides for digestion (especially after a large meal) or to help alleviate other ailments (simply match the herbs used to the desired treatment). This version is also great for cocktails (see the recipes below). Any herbs or whole spices can be made into a digestif or infusion, so use your imagination and my below selections and a guideline. You can find similar glass bottles at kitchen supply stores.

********************
Herbal Digestif
Clear, neutral alcohol, such as a decent quality Vodka or Everclear (I used Fleischmanns)
Selection of fresh herbs, approximately 6-7 sprigs of herbs for each quart (32oz) of alcohol (I used tarragon, rosemary, common thyme and lemon thyme)
1. Thoroughly wash selected herbs. Place in clean, dry container (such as a mason jar or glass bottle with stopper) and set aside.
2. In a saucepan, warm enough alcohol to fill bottle over medium-high heat. Bring to just under boiling. Remove from heat and pour into jar or container (use a funnel if needed).
3. Secure the top or lid of container and store in a cool, dry place for at least a week. Shake container each day for the first week to help release oils from herbs.
4. After one week, the digestif is ready to use (it will be a lovely shade of chartreuse). Filter with cheesecloth and discard herbs, if desired. Will keep indefinitely in a cool, dry location. Drink approximately one ounce each evening or after large meals for digestive aide, or serve in a cocktail. Enjoy!

Bloody Mary Mary Quite Contrary
Serves One
2 oz. herbal digestif
6 oz. tomato juice
4 drops Tabasco sauce
1/2 tsp. horseradish
1 tbsp. lemon juice
1/2 tsp. Worcestershire sauce
Celery salt and pepper, to taste
Combine all ingredients and shake with ice. Strain into a highball glass with ice, Garnish with a celery stalk.
Herb's Harvest
Serves Two
2 oz. herbal digestif
5 oz. pear puree
5 oz. lemon juice
1 oz. cranberry juice
1/2 oz. almond syrup
Combine all ingredients and shake with ice. Strain into an old-fashioned glass with ice. Garnish with a sprig of rosemary.
Garden Select Vodka Tonic
Serves One
1 tbsp. lemon juice
2 oz. herbal digestif
5 oz. tonic
Stir ingredients together in a highball glass with ice. Garnish with a rosemary sprig and a lemon slice.
Garden Ale
Serves One
2 oz. herbal digestif
1/2 oz. dry vermouth
1/2 oz. sweet vermouth
Ginger Ale
In a collins glass, combine herbal digestif and vermouth. Add ice and top with ginger ale. Garnish with an olive.
Wednesday, June 29, 2011
Freezing Strawberries
As marvelous and rewarding as berry picking is, it always brings a bit of melancholy. Fresh berries only last for so long, and once they are gone, they are gone. We wait an entire year to eat freshly harvested berries again.
![]()
Don't despair. If you haven't perserved a bit of summer by making jam, you can always freeze fresh berries to enjoy year-round. It's a simple process, but you'll need to make sure you have plenty of space in your freezer (so get ready to compost the box of waffles and frozen dinners that hit their expiration dates a year ago.
********************
Freezing Strawberries
1. Wash berries and remove hulls. Cut in half, or if preferred, leave whole.
![]()
2. Place berries in a single layer on a cookie sheet (or any sort of flat surface like a tray or baking dish - just be sure that it is safe for the freezer).
![]()
3. Place berries in freezer and allow to freeze for at least three hours or overnight. Once berries are frozen, remove from cookie sheet and place in freezer bags or containers. Berries will last in freezer for at least a year (provided you don't eat them before then!). This method works for any type of berry (I heard from an acquaintance that if you freeze blueberries or elderberries, then vacuum-seal them, they have the taste and texture of fresh berries!).

Don't despair. If you haven't perserved a bit of summer by making jam, you can always freeze fresh berries to enjoy year-round. It's a simple process, but you'll need to make sure you have plenty of space in your freezer (so get ready to compost the box of waffles and frozen dinners that hit their expiration dates a year ago.
********************
Freezing Strawberries
1. Wash berries and remove hulls. Cut in half, or if preferred, leave whole.

2. Place berries in a single layer on a cookie sheet (or any sort of flat surface like a tray or baking dish - just be sure that it is safe for the freezer).

3. Place berries in freezer and allow to freeze for at least three hours or overnight. Once berries are frozen, remove from cookie sheet and place in freezer bags or containers. Berries will last in freezer for at least a year (provided you don't eat them before then!). This method works for any type of berry (I heard from an acquaintance that if you freeze blueberries or elderberries, then vacuum-seal them, they have the taste and texture of fresh berries!).
Thursday, June 23, 2011
Container Herb Garden


Container gardening is a great sustainable solution for those with limited space (or those with a lot of space who just want easy access). While you can use any combination of containers that works for you, I like to have one big container for all my herbs (you would be surprised how many herb plants can fit!). Here are the steps:
1. Choose a container that is large enough to hold all of your herbs (go for something eco-friendly, like a BPA-free recycled plastic composite, terra cotta, or even vintage whiskey barrel (it's food safe!)). You don't want anything too heavy, unless you are going to plant it in place.
2. Create a good drainage system in your container by drilling small holes in the bottom of the pot (some might come with drainage holes) or lining the bottom of the container with one inch of rocks or gravel.
3. Fill the container within two inches from the top with a good, organic potting soil. Boost the soil's performace with an organic vegetable fertilizer (follow manufacturer's instructions for proper soil-to-fertilizer ratios).
4. Lay out your plants until satisfied with the placement. Using your hands, a dibble, or a small garden trowel, dig holes for the plants and place in the soil (be sure to scarify, or loosen and break up, the roots of the plants). Pat some potting soil around the base of the plant to secure it. Taller plants (like dill and rosemary) should be planted in the center or back of the container, with shorter or trailing herbs (like mint or thyme) on the sides or front. Water thoroughly.

I keep the garden marker with the plants to help identify them
That's it! Easy, right?! Be sure your container herb garden gets plenty of sunlight and water it whenever the soil becomes dry (usually everyday to every-other day, depending on the weather). In my whiskey barrel, I planted dill, rosemary, Mexican oregano, sage, common thyme, lemon thyme, pineapple mint, spearmint, peppermint, apple mint, marjoram, and tarragon. In the empty spaces, I planted strawberries. Afterall, this is Edie's garden, and she really likes picking strawberries. I planted basil, parsley, horehound and catnip in the "big" garden, but really enjoy having herbs right off the kitchen for quick additions to recipes.
Subscribe to:
Comments (Atom)